- Documentation
- FlowFuse User Manuals
- Using FlowFuse
- Getting Started
- Static asset service
- Bill of Materials
- FlowFuse Concepts
- Instance States
- Changing the Stack
- Custom Hostnames
- Custom Node Packages
- Dashboards
- DevOps Pipelines
- Environment Variables
- FlowFuse Expert
- FlowFuse File Nodes
- FlowFuse MQTT Nodes
- FlowFuse Persistent Context
- FlowFuse Project Nodes
- FlowFuse Tables
- Groups
- High Availability mode
- HTTP Access Tokens
- Instance Settings
- Logging
- Role-Based Access Control
- Shared Team Library
- Snapshots
- Team Broker
- Teams
- User Settings
- FlowFuse API
- Migrating a Node-RED project to FlowFuse
- Device Agent
- Device Agent
- Hardware Guides
- FlowFuse Cloud
- FlowFuse Cloud
- FlowFuse Self-Hosted
- Quick Start
- Installing FlowFuse
- Upgrading FlowFuse
- Administering FlowFuse
- Support
- Community Support
- Premium Support
- Debugging Node-RED issues
- Contributing
- Contributing to FlowFuse
Quick Start Guide: Device Agent
This guide will walk you through the process of adding a device to FlowFuse, connecting it to the platform, and deploying your Node-RED flows remotely. FlowFuse's Device Agent helps unlock the power of your devices by allowing you to manage and deploy Node-RED flows running on those devices securely and remotely.
Before you begin
You will need:
- A terminal or command prompt on the device you wish to install the Agent on
- A FlowFuse platform account; either on FlowFuse Cloud or a self-hosted platform.
If you do not currently have a FlowFuse platform account, this guide will help you set up a trial account on FlowFuse Cloud.
Step 1: Install the Device Agent
The Device Agent Installer is a one-line command that will:
- Install Node.js
- Get your device registered on a FlowFuse platform
- Configure it to run as a local service
It is the quickest way to get started.
If you already have Node.js v22+ installed, or need to customize the setup, check the manual installation guide.
Linux/MacOS
/bin/bash -c "$(curl -fsSL https://flowfuse.github.io/device-agent/get.sh)" && ./flowfuse-device-agent-installer
Windows
- Open a powershell terminal with elevated permission:
powershell -Command "Start-Process 'cmd' -Verb RunAs"
- Run the follow command in that terminal to download and run the installer:
powershell -c "irm https://flowfuse.github.io/device-agent/get.ps1 | iex; .\flowfuse-device-agent-installer.exe"
Note
The installer checks to see if port 1880 is available to use. If it isn't, it will let you know before exiting. This is typically because you already have Node-RED running locally. You can tell the installer to configure its Node-RED to use a different port using the --port <port> argument. Pick a different port, for example 1881 and re-run the above command with --port 1881 added to the end.
Note
By default, the installer will use /opt/flowfuse-device (Linux/MacOS) or c:\opt\flowfuse-device (Windows) as the install location. To use a different location, use the --dir option with the install command. For example, --dir /path/to/custom/location.
Step 2: Follow the installer prompts
The installer will step you through the whole setup process.
It will ask if you are registering a new instance or connecting with a One-Time Code (OTC).
Registering a new instance
Select this option if you have not yet registered the instance on your FlowFuse platform.
It will give you a URL to open in your browser where you can register the instance. Once you complete the registration, keep the browser tab open and switch back to the terminal.
Connecting with a One-Time Code
If you have already registered the instance on FlowFuse, the platform will have given you a One-Time Code to use when installing the Device Agent.
Enter the code when prompted and the Device Agent will connect.
Step 3: Import existing flows
The Agent will check common locations for existing Node-RED flows. If it finds any, it will ask if you want to import those flows into your Device Agent managed Node-RED. This makes it easy to migrate an existing Node-RED setup into a fully managed FlowFuse instance. If you want to run an entirely separate instance, you can skip this step.
Step 4: Setup a system service
The Installer will then setup a system service so the Device Agent automatically runs when the device restarts.
Step 5: Start editing your flows
Once the Device Agent is running, and Node-RED has started, you can start editing your flows.
If you still have the browser window open from registering the device, it will automatically put the instance into 'Developer Mode' and open up the Node-RED editor.
From there you can start building your applications.
Deploy Flows to Remote Instances
There are two approaches to deploying flows to your Remote Instances.
- Developer Mode: This mode allows you to edit and deploy flows directly from the FlowFuse platform.
- DevOps Pipelines: FlowFuse provides DevOps Pipelines as a way of pushing flows from one Hosted Instance/Remote Instance to another (or several in the case of Device Groups). This is the recommended approach if you're pushing from development environments (e.g. remote test instances) out to remote production instances.
Developer Mode
- Navigate to Applications and select the application your device was added to.
- Go to the Remote Instances tab within the application.
- Locate your newly added device and click on your Remote Instance.
- Then Click Developer Mode toggle button on upper right.
 The "Developer Mode" toggle button available on the Device screen
 - This will enable editor access for your device.
 The "Device Editor" button available on the Device screen
 - Clicking Device Editor will launch the editor.
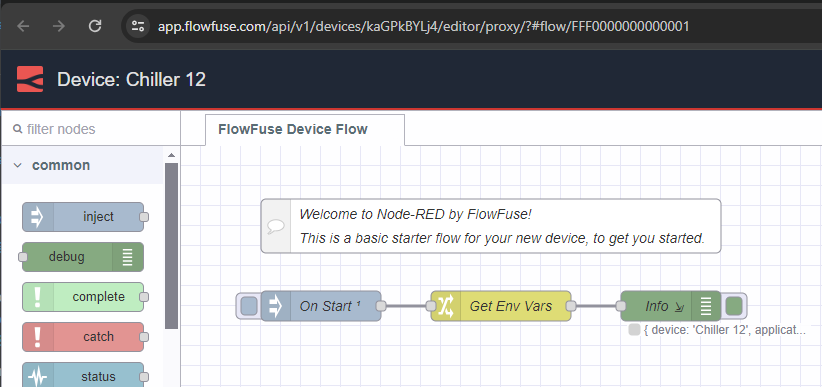 Screenshot of a Node-RED Editor for a Device
DevOps Pipelines
 {data-zoomable}
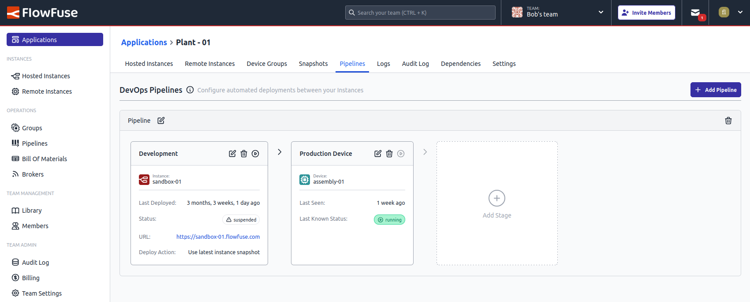
Screenshot showing the user interface for creating and running DevOps Pipelines in FlowFuse
{data-zoomable}
Screenshot showing the user interface for creating and running DevOps Pipelines in FlowFuse
To work with Pipelines, you need at least one other Hosted Instance or Remote Device to push from/to. You can follow the instructions on setting up a Pipeline and deploying your flows between Hosted Instances/Remote Instances DevOps Pipelines.
Next Steps
Now you have a device connected to the platform, there are many features you can use to manage and monitor your Remote Instances. Here are a few to get you started: